Your Guide to Building an API in Django
Ready to build a powerful API in Django? This guide provides actionable steps and real-world examples to help you create robust APIs with Django REST Framework.

If you're thinking about building an API, using Django is a fantastic choice. The framework's whole "batteries-included" philosophy really shines here. It hands you a bunch of powerful, pre-built components for things like authentication and database management right out of the gate, which saves a ton of setup time.
When you pair that solid foundation with the Django REST Framework (DRF), you get a setup that seriously cuts down on development time and gives you a scalable backbone for pretty much any project you can dream up.
Why Django Is a Go-To for API Development
Before we jump into the code, let's quickly cover why Django is such a trusted tool for building APIs that are both robust and scalable. At its heart, Django is all about speed and efficiency. It’s designed to help you get from an idea to a working application as fast as humanly possible.
This speed boost comes from its built-in features that take care of the repetitive, common tasks. Why build a user authentication system from the ground up when Django provides a secure, battle-tested one? The same logic applies to its Object-Relational Mapper (ORM), which makes talking to your database a breeze and helps guard against nasty stuff like SQL injection.
The Power of Django REST Framework
While Django lays the groundwork, the Django REST Framework (DRF) is the specialized tool that makes the whole process so smooth. Think of DRF as an add-on that's laser-focused on creating web APIs, offering a suite of tools to simplify what would otherwise be complex work.
Here’s what makes DRF so great:
- Serialization: It’s a genius at converting complex data, like your Django models, into simple formats like JSON that web clients can easily understand.
- Authentication & Permissions: It offers a whole menu of security options, from simple sessions to advanced token-based systems, letting you lock down your endpoints with ease.
- Browsable API: This is a developer favorite. DRF automatically creates a user-friendly HTML interface for your API, which is an absolute lifesaver for testing and debugging.
The real magic of combining Django with DRF is how it vaporizes boilerplate code. You can spin up a full set of CRUD (Create, Read, Update, Delete) endpoints for a database model with just a handful of lines. This lets you stop worrying about the plumbing and start focusing on what makes your application unique.
Proven Scalability and Reliability
Django isn't just for hobby projects; it’s a heavyweight framework that can handle massive traffic and complicated logic. Its architecture is designed to scale, which is why it’s the engine behind some of the internet's biggest names.
Just look at Instagram. It's one of the most famous examples of Django in the wild, and by 2022, it was handling 2 billion monthly active users. That's a testament to Django's ability to support huge, complex API-driven applications. You can find more examples of popular sites built on Django on djangostars.com.
This kind of track record gives you confidence that Django can grow with your app, from a simple MVP to a global platform. Whether you're a startup or an enterprise, the principles behind reliable Python/Django development services provide a solid, future-proof backend.
Setting Up Your Project for API Success
Alright, let's roll up our sleeves and lay the groundwork for our API. Getting your project structure right from the beginning is one of those things that pays massive dividends down the road. It’s the difference between a clean, maintainable application and a tangled mess that's a nightmare to scale. We're going to start from scratch and build up a fully configured Django project, ready for its first endpoint.

This whole process boils down to a few key moves: creating an isolated environment for our code, installing the right packages, and making a couple of essential tweaks to Django's settings. Nail these steps, and you'll be starting on solid ground.
Establishing a Clean Workspace
First things first: every professional Python project needs a virtual environment. Think of it as a clean, private sandbox for your project. It keeps all the packages and dependencies for this specific API from interfering with other projects on your machine. This isn't just a suggestion—it's a best practice you should never skip.
Let's get our folder and environment set up. Pop open your terminal and run these commands:
Create and jump into your project directory
mkdir my_django_api && cd my_django_api
Create a virtual environment called 'venv'
python -m venv venv
Fire up the virtual environment
On macOS/Linux:
source venv/bin/activate
On Windows:
venv\Scripts\activate
You'll know it worked when you see your terminal prompt change. That's your cue that you're now working inside the isolated environment, and anything you install will stay neatly contained within it.
Installing Django and the REST Framework
With our sandbox active, it's time to bring in the heavy hitters: Django and the Django REST Framework (DRF). We'll use pip, Python's trusty package installer, to grab them.
Install Django and its REST framework
pip install django djangorestframework
This simple command pulls down both frameworks and installs them right into your venv. Just like that, you have everything you need to build not just a regular Django website, but a powerful web API.
Now we can generate the actual Django project files. This command creates the manage.py utility and the main project configuration folder.
Create a new Django project named 'core' in the current directory
django-admin startproject core .
That little dot (.) at the end is a pro-tip. It tells Django to create the project right here, which avoids an extra, unnecessary folder layer in your structure. It's a small thing, but it keeps your project layout tidy.
My Takeaway: A structured setup isn't just about being neat; it's the first step toward a successful, manageable project. By isolating your dependencies and using standard commands, you create a foundation that's predictable and easy to work with. This initial discipline will save you countless headaches later on.
Configuring Your Project Settings
The final piece of the puzzle is letting Django know about the REST framework. This all happens in the settings.py file, which you'll find inside the core directory. This file is the command center for your entire project, controlling everything from your database to which apps are active.
Go ahead and open core/settings.py and find the INSTALLED_APPS list. All you need to do is add rest_framework to it. This one line registers DRF with your project and unlocks all of its amazing features.
Your INSTALLED_APPS list should end up looking like this:
INSTALLED_APPS = [ 'django.contrib.admin', 'django.contrib.auth', 'django.contrib.contenttypes', 'django.contrib.sessions', 'django.contrib.messages', 'django.contrib.staticfiles', # Add the REST Framework here 'rest_framework', ]
This small addition is what enables everything from data serialization to the browsable API we'll see later. Of course, a well-configured project is only half the battle; exploring strategies to improve developer productivity can make a huge difference in how efficiently you build.
Now that our project is configured, we're officially ready to start defining our data models and building out the API itself.
Defining Data with Models and Serializers
At its heart, an API is just a structured way to share information. But before you can send anything out, you have to decide what that information actually looks like. In the Django world, this all begins with models. Think of a Django model as the single, definitive blueprint for your data—it dictates exactly how your information is structured and stored in the database.
But there’s a small problem. Your database stores data in a complex way that web clients can't just magically understand. That’s where serializers jump in. They act as translators, converting your Django models into a universal format like JSON. This translation process is the real magic behind building an api in django.
Crafting Your First Django Model
Let's say we're building a simple API to track books. The most basic piece of data we need is, well, a Book. We’ll define this as a Django model, which is really just a Python class that inherits from models.Model.
First things first, let's create a new app to keep our API logic neat and tidy. Good organization is key.
python manage.py startapp books
Now, make sure to tell Django about your new app by adding 'books' to the INSTALLED_APPS list in core/settings.py. With that done, pop open books/models.py and define the Book model.
from django.db import models
class Book(models.Model): title = models.CharField(max_length=200) author = models.CharField(max_length=100) publication_date = models.DateField() isbn = models.CharField(max_length=13, unique=True)
def __str__(self):
    return self.title
This simple class lays out four fields: a title, author, publication date, and an ISBN. After writing the model, you need to tell your database about it by creating and running migrations.
python manage.py makemigrations python manage.py migrate
And just like that, Django creates a new table in your database that perfectly matches the Book model. Your data now has a place to live.
Translating Models with Serializers
Okay, we have a data structure. Now we need to translate it into JSON. This is precisely what the Django REST Framework's Serializer was built for. It takes your model instances and converts them into Python dictionaries, which can then be rendered effortlessly into JSON.
Go ahead and create a new file named serializers.py inside your books app. Then, add this code:
from rest_framework import serializers from .models import Book
class BookSerializer(serializers.ModelSerializer): class Meta: model = Book fields = ['id', 'title', 'author', 'publication_date', 'isbn']
See how clean that is? The ModelSerializer is one of my favorite DRF shortcuts. It automatically inspects your Book model and generates the serializer fields for you. The fields attribute simply tells DRF which pieces of the model you want to include in the API output. Notice we included id, which Django adds to every model for us automatically.
Why Serializers Are a Game-Changer: They do more than just convert data. Serializers also handle data validation out of the box. When a client sends data to create or update a book, the serializer will automatically check that
publication_dateis a valid date and that thetitleisn't too long. This built-in validation saves a ton of time and helps keep your data pristine.
It's no surprise that using Django for APIs has become so popular. A recent JetBrains survey found that 60% of full-time developers using Django are building APIs. This really speaks to the framework's power and reliability in a world driven by data. You can find more insights on how Django supports modern development at builtin.com.
How Django Models Map to Serializer Fields
The real magic behind ModelSerializer is its knack for intelligently mapping your Django model fields to the right DRF serializer fields. This automation cuts down on a lot of repetitive code and reduces the chance for silly mistakes.
This table shows how common Django model fields are automatically mapped to Django REST Framework serializer fields, simplifying data conversion.
Mapping Django Model Fields to DRF Serializer Fields
Django Model Field (models.) | DRF Serializer Field (serializers.) | Example Use Case |
|---|---|---|
CharField | CharField | Storing text data like a book title. |
IntegerField | IntegerField | Representing whole numbers, such as pages. |
DateField | DateField | Storing a date without a time component. |
DateTimeField | DateTimeField | Capturing precise timestamps. |
BooleanField | BooleanField | Handling true/false values. |
ForeignKey | PrimaryKeyRelatedField | Linking to another model, like an author. |
Getting a feel for this mapping helps you predict how your API will behave and know exactly how to customize your serializers when the default isn't quite what you need.
With our model defined and our serializer ready to go, we're all set to create the actual API endpoints that will serve this data up to the world.
Creating Endpoints with Views and Routers
Alright, you've got your data structure (models) and your translator (serializers). Now it's time for the fun part: building the actual pathways for the outside world to interact with that data. These are your API endpoints. This is where Django REST Framework's ViewSets and Routers come in, and honestly, they feel a bit like magic. They team up to automate what is often the most repetitive part of building an api in django.
A ViewSet is a brilliant concept that bundles all the related logic for a resource into a single class. Think about it: instead of writing one function to list all books, another to get a single book, a third to create a new one, and so on, a ModelViewSet handles all of that heavy lifting for you. It's designed to give you a complete set of CRUD (Create, Read, Update, Delete) actions for a model with almost no code.
The whole process flows logically: you define your views, wire up the URLs to point to them, and then you're ready to start making requests.
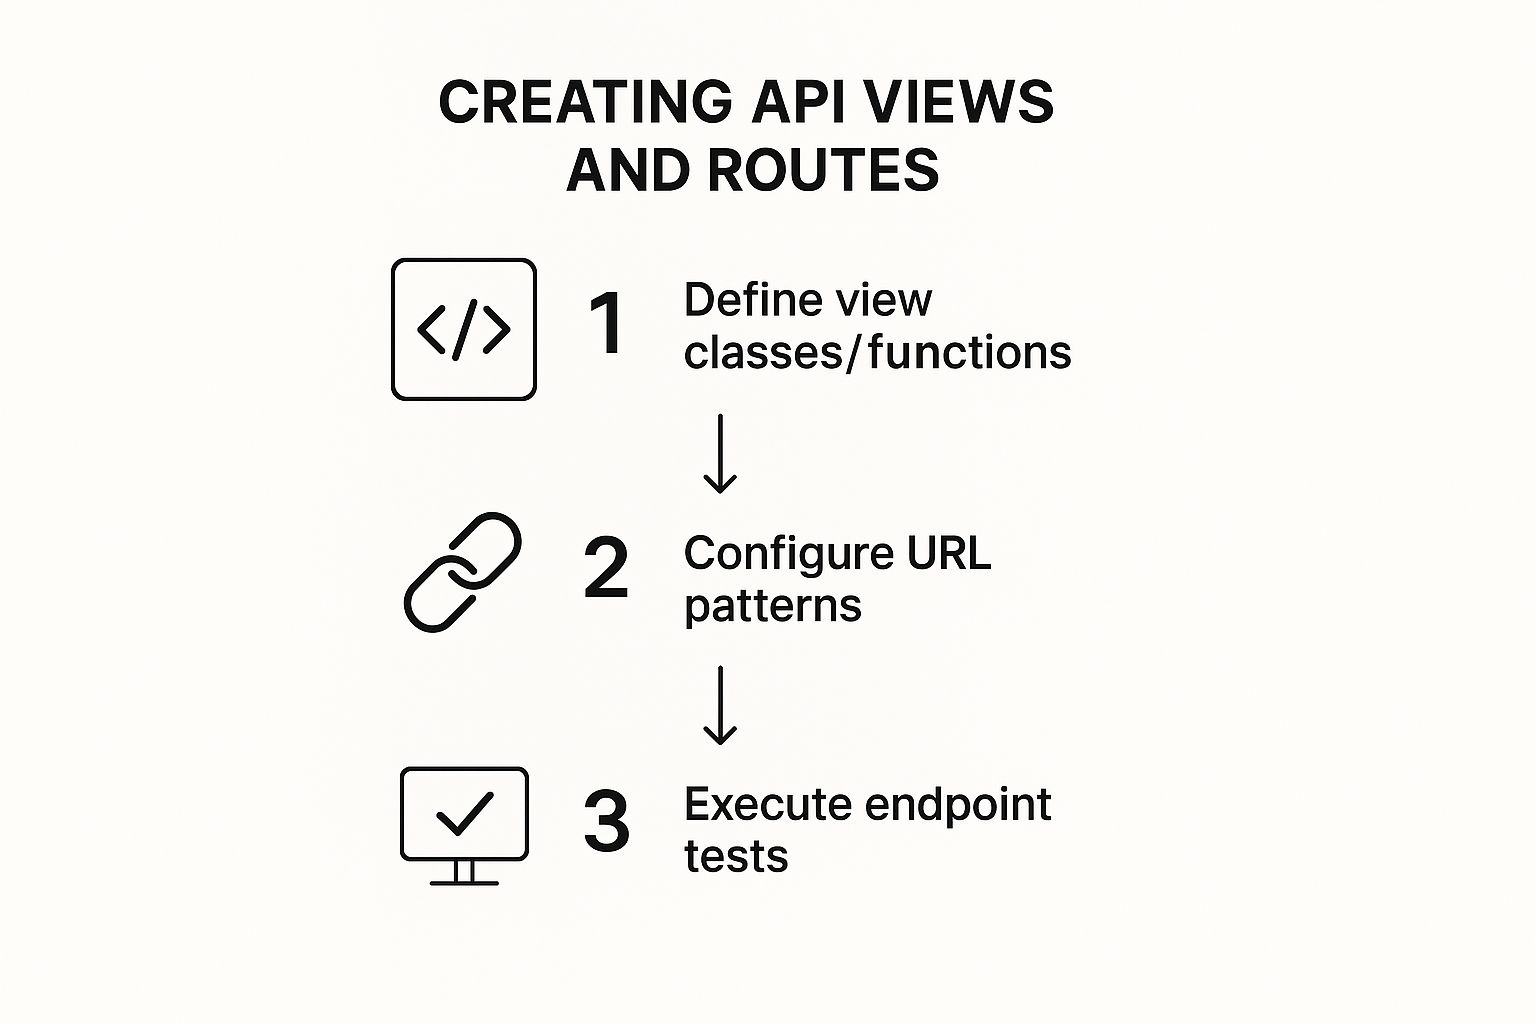
This shows just how neatly DRF's components slot together, dramatically simplifying the journey from a database model to a live API.
Implementing a ModelViewSet
Let's put this into practice with our Book model. Pop open the books/views.py file that Django created for you and drop in the following code. This single class is about to become the heart of your book management API.
from rest_framework import viewsets from .models import Book from .serializers import BookSerializer
class BookViewSet(viewsets.ModelViewSet): """ A viewset for viewing and editing book instances. """ queryset = Book.objects.all() serializer_class = BookSerializer
That's it. Seriously. With just those three lines, you’ve defined all the logic needed to perform every standard database operation on your Book model. The queryset attribute tells the viewset which objects it's responsible for, and serializer_class tells it how to convert those objects to and from JSON.
A Pro Tip: The
ModelViewSetis so powerful because it inherits fromGenericAPIViewand includes pre-built implementations for actions like.list(),.retrieve(),.create(),.update(), and.destroy(). By just defining those two class attributes, you're tapping into a massive amount of well-tested, ready-to-go functionality.
This approach is incredibly efficient. It keeps your code clean, readable, and consistent, which is a lifesaver on larger projects. You're not just saving time; you're adopting a pattern that makes your API predictable and easy for other developers to pick up.
Connecting Views with Routers
Having a powerful ViewSet is great, but it's useless if no URLs point to it. This is where DRF's Router steps in to complete the automation. A router inspects your ViewSet and automatically generates the entire set of URL patterns you need. It's another huge time-saver that frees you from manually wiring up every single endpoint.
First, you'll need to create a urls.py file inside your books app folder. Inside this new file, add the following:
from rest_framework.routers import DefaultRouter from .views import BookViewSet
router = DefaultRouter() router.register(r'books', BookViewSet, basename='book') urlpatterns = router.urls
So, what's happening here?
DefaultRouter(): We're creating an instance of DRF'sDefaultRouter. The big advantage of this router is that it also creates a root API view that lists all your available endpoints—super helpful during development.router.register(): This is the key. We're registering ourBookViewSetwith the router, telling it to create a set of URLs under thebooks/prefix.
Finally, we just need to tell our main project's URL configuration about these new, app-specific URLs. Open core/urls.py and modify it to include the URLs from your books app.
from django.contrib import admin from django.urls import path, include
urlpatterns = [ path('admin/', admin.site.urls), path('api/', include('books.urls')), ]
By including books.urls under the api/ path, your endpoints are now live. The router automatically generates all the standard URL patterns for you:
GET /api/books/: Lists all books.POST /api/books/: Creates a new book.GET /api/books/{id}/: Retrieves a single book by its ID.PUT /api/books/{id}/: Updates a book.DELETE /api/books/{id}/: Deletes a book.
And just like that, with a few small configurations, you have a fully functional, well-structured REST API. This is the real power of building an api in django with the REST framework—it handles the grunt work so you can focus on what makes your application unique.
Securing Your API with Authentication
Okay, you've got live endpoints. That's a huge milestone. But right now, anyone on the internet can hit them, which is a massive security hole. It's time to lock things down. We need to add a digital bouncer to our API to check IDs and make sure only the right people get in. This is where authentication and permissions become your best friends for building a professional api in django.
Django REST Framework (DRF) has a really smart way of handling this. It splits security into two distinct concepts:
- Authentication: Who is this person?
- Permissions: What is this person allowed to do?
Keeping these separate makes it surprisingly easy to build out complex security rules as your application gets bigger.
Choosing the Right Authentication Method
DRF gives you a few out-of-the-box options for authentication, but your choice usually boils down to how your API will be used.
SessionAuthentication: This is your go-to if your API is being used by a front end that's part of the same Django project. Think of a classic web app where users log in with a username and password. It just piggybacks on Django's standard session system.TokenAuthentication: If you're building an API for a mobile app, a single-page application (like React or Vue), or another service, this is what you want. It's a simple, stateless approach. A user gets a unique token, and they have to include it in every request to prove who they are.
Since most modern APIs are designed for external clients, we’ll set up TokenAuthentication. It’s a battle-tested and incredibly common way to secure an API.
Implementing Token-Based Authentication
First things first, we need to tell Django about DRF's token app. Open up core/settings.py and add rest_framework.authtoken to your INSTALLED_APPS list. This little app provides the database model for storing all the user tokens.
Once that's added, run your migrations to get the new table into your database.
python manage.py migrate
Now, how do users get a token? The best practice is to generate one automatically the moment they sign up. Django's signals are perfect for this. In your books/models.py (or a dedicated users app if you have one), drop in this code snippet:
from django.conf import settings from django.db.models.signals import post_save from django.dispatch import receiver from rest_framework.authtoken.models import Token
@receiver(post_save, sender=settings.AUTH_USER_MODEL) def create_auth_token(sender, instance=None, created=False, **kwargs): if created: Token.objects.create(user=instance)
This code listens for a new user being saved to the database. If it's a brand-new user (created=True), it immediately creates a new Token object and links it to them. Simple and effective.
Key Insight: While auto-generating tokens on signup is great, you'll also want an endpoint where users can log in to get a token, especially if they lose theirs. DRF has a built-in view for this called
obtain_auth_tokenthat handles exchanging a username and password for a token.
This setup is a standard pattern and a great example of why so many developers choose Django. It's a powerhouse for back-end systems, currently used by over 55,000 websites globally. You can find more data on Django's widespread use at WebTechSurvey.
Enforcing Permissions on Endpoints
Now that we know who is making a request, we can decide what they're allowed to do. Let's make it so only logged-in users can see our list of books.
This is a one-line change in books/views.py. Just add a permission_classes attribute to your BookViewSet.
from rest_framework import viewsets from rest_framework.permissions import IsAuthenticated from .models import Book from .serializers import BookSerializer
class BookViewSet(viewsets.ModelViewSet): queryset = Book.objects.all() serializer_class = BookSerializer permission_classes = [IsAuthenticated]
That’s it. By adding permission_classes = [IsAuthenticated], you've told DRF to reject any request to this viewset that doesn't include a valid token. Anyone trying to access it without authenticating will get a "401 Unauthorized" response. This single line protects all the endpoints (GET, POST, PUT, etc.) for our books.
As you move toward production, integrating these security measures with solid DevOps practices is key to building a truly resilient and secure application.
Common Questions About Django APIs
Once you start building a real api in django, you'll naturally run into some common questions. I've seen these trip up developers time and time again, so let's tackle them head-on to clear things up and get you ready for more advanced work.
Whats the Difference Between Django and Django REST Framework
This is probably the first question everyone asks, and it’s a great one. The simplest way I explain it is this: Django is the entire engine for your web application. It handles everything from your database models and business logic to rendering pages on the server. It's the whole foundation.
Django REST Framework (DRF) isn't a replacement for Django; it’s a specialized toolkit that plugs right into it. Think of it as a set of power tools designed specifically for building APIs.
Sure, you could build an API using just Django's built-in JsonResponse, but you’d spend ages reinventing the wheel. DRF gives you a massive head start with ready-made components for the most common API tasks:
- Data Serializers: These are your translators, turning complex data like Django models into clean, portable JSON.
- Authentication Systems: DRF provides plug-and-play security, handling things like Token and Session authentication out of the box.
- Browsable API: This one is a huge time-saver. DRF automatically generates a user-friendly web interface for viewing and testing your API endpoints.
So, in short: Django is the car, and DRF is the turbocharger you add to make it an API-serving machine.
How Should I Handle Versioning for My Django API
Versioning is one of those things you'll be thankful for later. As your API grows, you'll inevitably need to make changes—maybe renaming a field or restructuring a response. Without versioning, any "breaking change" like that would instantly break every application that depends on your API.
DRF gives you a few ways to handle this, but my go-to recommendation for most projects is URLPathVersioning. It's straightforward and explicit. The API version is placed directly in the URL, so there’s no ambiguity for the developers using it.
A versioned endpoint would look something like this: /api/v1/books/
Setting this up is surprisingly simple. You just add a couple of lines to your settings.py file to tell DRF you're using URLPathVersioning and specify which versions are available. This approach is fantastic because it lets you launch a new v2 with major improvements while your older clients can continue using v1 completely uninterrupted.
Managing different API versions means you also have to manage different sets of documentation. Clear docs for each version are non-negotiable. For some great tips on this, check out these technical documentation best practices.
This separation is what keeps your API stable and predictable for everyone who relies on it.
Whats the Best Way to Test My Django API
Let's be clear: testing isn't optional. It's the only way you can confidently refactor code or ship new features without worrying that you just broke something important. A solid test suite is your safety net.
The great news is that DRF integrates perfectly with Django's already excellent testing framework. The standard practice, and the one I always use, is to build your tests with DRF's APITestCase class. It's an extension of Django's TestCase but comes with extra tools specifically for APIs.
Why APITestCase?
- It gives you a special
APIClientthat makes it dead simple to simulateGET,POST, andPUTrequests. - It handles the JSON formatting for your requests and responses automatically.
- You can easily force authentication, letting you test protected endpoints as if you were a logged-in user.
To be effective, your tests should cover a few key scenarios. You need to check for success (like a 200 OK status code on a GET request), test for failure (a 400 Bad Request when you send bad data), and definitely confirm your security rules work (expecting 401 Unauthorized or 403 Forbidden status codes when they should appear).
Writing these tests gives you the confidence to keep building and improving your API without fear.
Ready to build a high-performance, scalable web application? 42 Coffee Cups specializes in Next.js and Python/Django development, helping startups and enterprises accelerate their growth. Let's build your next project together.