Build a Powerful API with Django From Scratch
Learn how to build a production-ready API with Django. This guide covers setup, models, serializers, security, and deployment for your next project.

Building an API with Django is a go-to move for developers who need to get things done quickly without sacrificing security or scalability. The framework’s "batteries-included" philosophy gives you a ton of powerful, pre-built components right out of the box. This means you can build a solid backend way faster than if you were starting from scratch.
Why Choose Django for Your Next API
Picking the right framework for your API is a big deal. It sets the tone for how fast you can build, how easily you can scale, and how much of a headache maintenance will be down the road. Django, the high-level Python web framework, is a rock-solid choice, especially when you bring the Django REST Framework (DRF) into the mix.
The real magic of Django is its core philosophy: everything you need is already in the box. Features like a powerful Object-Relational Mapper (ORM), built-in user authentication, and an automatic admin panel are ready to go from day one. It also comes with built-in protections against common security threats like SQL injection and cross-site scripting. This approach saves a massive amount of setup time, letting you jump straight into building the parts of your application that actually matter.
The Power of Django REST Framework
If Django is the engine, then Django REST Framework (DRF) is the high-performance toolkit that makes building a web API with Django such a smooth ride. DRF plugs directly into Django and gives you everything you need for API development.
Here are a few of the standout features:
- Serializers: Think of these as your data translators. They effortlessly convert complex data, like Django models, into clean JSON that your frontend can easily digest.
- Authentication & Permissions: DRF makes it incredibly simple to lock down your endpoints. It comes with multiple authentication methods (like Token or Session-based) and lets you set up detailed, fine-grained permissions.
- Browsable API: This is a huge time-saver. DRF automatically generates a clean, interactive web interface for your API. You can test and explore your endpoints right from the browser without needing a separate tool.
This powerful combination is why Django is so popular for building APIs all over the world. The numbers speak for themselves: over 21,000 websites in the U.S. and more than 7,000 in Germany are built with Django. You can see more details on Django's global footprint over at WebTechSurvey.
Using DRF isn't just about moving faster—it's about building better. It naturally pushes you toward creating clean, well-structured RESTful APIs that are easy for other developers to work with.
When you bet on Django and DRF, you're not just choosing tools; you're tapping into a mature, well-documented, and incredibly active ecosystem. With a huge community behind it, you'll find answers to almost any problem you run into. The framework's ability to scale has been proven time and again by tech giants like Instagram and Spotify.
If you're interested in how professionals approach this, you can learn more about expert Python and Django development.
Setting Up Your Development Environment
Before we jump into writing a single line of API code, we need to get our workspace set up properly. Trust me, spending a few minutes on a clean, stable development environment now will save you from a world of pain later, especially when you're managing all the different packages for your API with Django. Think of this as laying a solid foundation—it ensures what you build on your machine will work just as you expect when it's out in the wild.
First thing's first: create a new, dedicated folder for your project. This simple step keeps all your files neatly organized and separate from everything else on your computer. Once you've made that directory, the next critical move is to create a Python virtual environment inside it.
The official Django homepage nails it: this framework is for "perfectionists with deadlines." That philosophy of clean, rapid development begins with a pristine environment, which is exactly what a virtual environment gives us.
Creating an Isolated Workspace
So, what is a virtual environment? It's basically a self-contained bubble for your Python project. It lets you install specific versions of packages for one project without messing up any others on your system. For any serious development, this is a non-negotiable step to avoid those dreaded version-conflict headaches.
Getting one started is straightforward using Python's built-in venv module. Just pop open your terminal in the project folder and run the appropriate command for your system:
- For Mac/Linux: python3 -m venv venv source venv/bin/activate
- For Windows: py -m venv venv .\venv\Scripts\activate
You'll know it worked when your command line prompt changes slightly. That's your cue that you're now working inside this isolated space. From now on, any package you install will live only within this venv folder.
With our environment active, it's time to bring in the heavy hitters: Django for the web framework itself and Django REST Framework (DRF) for all the API magic.
pip install django djangorestframework
That one command gets you both essential libraries. Once they're installed, it’s a great habit to immediately "freeze" these dependencies into a requirements.txt file.
pip freeze > requirements.txt
Pro Tip: Creating a
requirements.txtfile early is an absolute lifesaver. It’s like a recipe for your project's setup, making it dead simple for a new team member to get up and running or for you to replicate the environment anywhere else.
Initializing Your Django Project
Alright, our environment is prepped. Now we can lay down the actual Django project and create our first app. A common practice, and one I highly recommend, is to create a dedicated app just for your API logic. This keeps things cleanly separated from other parts of your project, like a potential web frontend.
Here are the two commands you'll need:
- Start a new project: This command creates the main project skeleton. Let's call our project
api_project. The.at the end tells it to create the project in the current directory.django-admin startproject api_project . - Create a dedicated API app: Now, inside that project, we'll make a new app specifically for our API endpoints. We'll call it
api.python manage.py startapp api
The final piece of the puzzle is to tell Django that our new app and the REST framework exist. Open up api_project/settings.py and add both rest_framework and your api app to the INSTALLED_APPS list.
This step officially registers them with your project. And just like that, you're configured and ready for the next phase! If you're interested in exploring the wider Python web world, our guide on https://www.42coffeecups.com/blog/python-web-application-development provides some great context. As you build more complex projects, you might also look into tools like Blockbee's official Django library for specialized integrations.
Defining Data With Models And Serializers
Building a solid RESTful API starts with a clear data structure. Django’s ORM turns database tables into familiar Python classes, so you spend less time writing raw SQL and more time designing your feature set.
By defining models first, you create a single source of truth for how data lives and behaves. From there, serializers translate those models into JSON, making your API both predictable and robust.
Crafting Your First Django Model
Let’s sketch out a simple Todo class in your api/models.py. Each attribute here becomes a column in your database table.
from django.db import models
class Todo(models.Model): title = models.CharField(max_length=200) description = models.TextField(blank=True) completed = models.BooleanField(default=False) created_at = models.DateTimeField(auto_now_add=True)
def __str__(self):
    return self.title
Once you’re happy with the fields—title, description, completed flag and timestamp—you’ll need to sync these changes with your database. Run:
python manage.py makemigrationspython manage.py migrate
These commands generate a migration file and then apply it, creating the Todo table under the hood.
Translating Data With Serializers
With your model in place, it’s time to give clients a way to speak JSON. Enter Django REST Framework’s ModelSerializer, which inspects your model and handles both conversion and validation.
Create api/serializers.py and add:
from rest_framework import serializers from .models import Todo
class TodoSerializer(serializers.ModelSerializer): class Meta: model = Todo fields = ['id', 'title', 'description', 'completed', 'created_at']
Now incoming JSON can be validated against those fields, and outgoing objects will appear as neatly formatted JSON.
A well-designed serializer is the backbone of a clean API. It enforces data consistency and acts as a single source of truth for your data representation, making your API predictable and easy for frontend developers to consume.
Recent surveys show 60% of Django developers rely on it for API work, while 74% use it in full-stack projects. The global AI market reached $638.23 billion in 2024—proof that well-structured APIs are more important than ever. Learn more about Django’s role in AI-driven applications on Built In.
With models defining your data and serializers handling translation, you’re ready to expose endpoints that let the world interact with your tasks.
Django Model Field Types vs JSON Output
Below is a quick reference showing how common Django model fields map to JSON types via the REST Framework serializer.
| Django Model Field | Example Value | Serialized JSON Type |
|---|---|---|
| CharField(max_length=200) | "Buy groceries" | string |
| TextField(blank=True) | "Remember to buy milk and eggs." | string |
| BooleanField(default=False) | true | boolean |
| DateTimeField(auto_now_add=True) | "2024-07-21T15:30:00Z" | string (ISO 8601 format) |
This table helps you spot how Django’s field definitions turn into JSON-friendly data types, smoothing out any surprises when your frontend team starts consuming the API.
Creating API Endpoints with Views and Routers
Alright, we've got our data model and a serializer that knows how to translate it. Now for the fun part: creating the actual API endpoints. These are the URLs our frontend (or any client application) will talk to. This is where the Django REST Framework really starts to feel like magic, turning what could be a repetitive slog into something incredibly clean.
DRF gives us a powerful concept called a ViewSet. Instead of writing separate functions or classes for listing, creating, retrieving, updating, and deleting items, a ViewSet bundles all that common logic into a single class. It's a huge time-saver that cuts down on boilerplate code and keeps your views.py file from becoming a mess.
For our Todo app, we’ll use a ModelViewSet. It’s the workhorse of DRF and automatically hooks up all the CRUD (Create, Read, Update, Delete) operations for a model with just a few lines of code. You’ll see what I mean in a second.
Implementing a ModelViewSet for Full CRUD
Let's get this view built. Open up your api/views.py file and pop in this code. It's shockingly simple for everything it does.
from rest_framework import viewsets from .models import Todo from .serializers import TodoSerializer
class TodoViewSet(viewsets.ModelViewSet): """ A viewset for viewing and editing todo instances. """ queryset = Todo.objects.all() serializer_class = TodoSerializer
That’s it. Seriously. Just by telling the ModelViewSet what data to use (queryset) and how to serialize it (serializer_class), DRF handles the rest. It now knows how to list all todos, create a new one, fetch a specific one by its ID, update it, and even delete it.
This is a perfect example of Django's "Don't Repeat Yourself" (DRY) philosophy. A
ModelViewSetkeeps you from writing five or six separate views, which is a massive productivity boost when you're building a Django API.
The Django community is always pushing things forward, especially when it comes to API performance. A recent survey of over 4,000 developers showed that 61% are now using asynchronous programming in their Django projects, up from 53% the year before. This shift is all about building faster, more scalable APIs. You can find more insights on Django developer trends at TMS Outsource.
Connecting URLs with Routers
We have our ViewSet, but it isn't connected to anything yet. We need to tell Django which URLs should point to it. Manually creating URL patterns for every single action (like GET, POST, PUT) would be tedious and error-prone. Thankfully, DRF has a solution for this too: Routers.
A router automatically generates the necessary URL patterns for a ViewSet. We'll use the DefaultRouter, which has the added bonus of creating a nice, browsable root API view that shows all your endpoints. It's great for development and testing.
First, let's create a new file, api/urls.py, to hold our app-specific URLs.
from django.urls import path, include from rest_framework.routers import DefaultRouter from .views import TodoViewSet
Create a router and register our viewset with it.
router = DefaultRouter() router.register(r'todos', TodoViewSet, basename='todo')
The API URLs are now determined automatically by the router.
urlpatterns = [
path('', include(router.urls)),
]
Now we just need to tell our main project about these new API URLs. Open up api_project/urls.py and make sure it includes the routes from our api app.
from django.contrib import admin from django.urls import path, include
urlpatterns = [ path('admin/', admin.site.urls), path('api/', include('api.urls')), ]
And that's all it takes. The router now handles generating the URLs for us. You'll have /api/todos/ for listing all items or creating a new one, and /api/todos/<pk>/ for grabbing, updating, or deleting a specific todo. As your API grows, it's a good idea to follow some established API design best practices to keep things consistent and easy to use.
This diagram helps visualize how security works in a Django API, showing the journey of a request from start to finish.
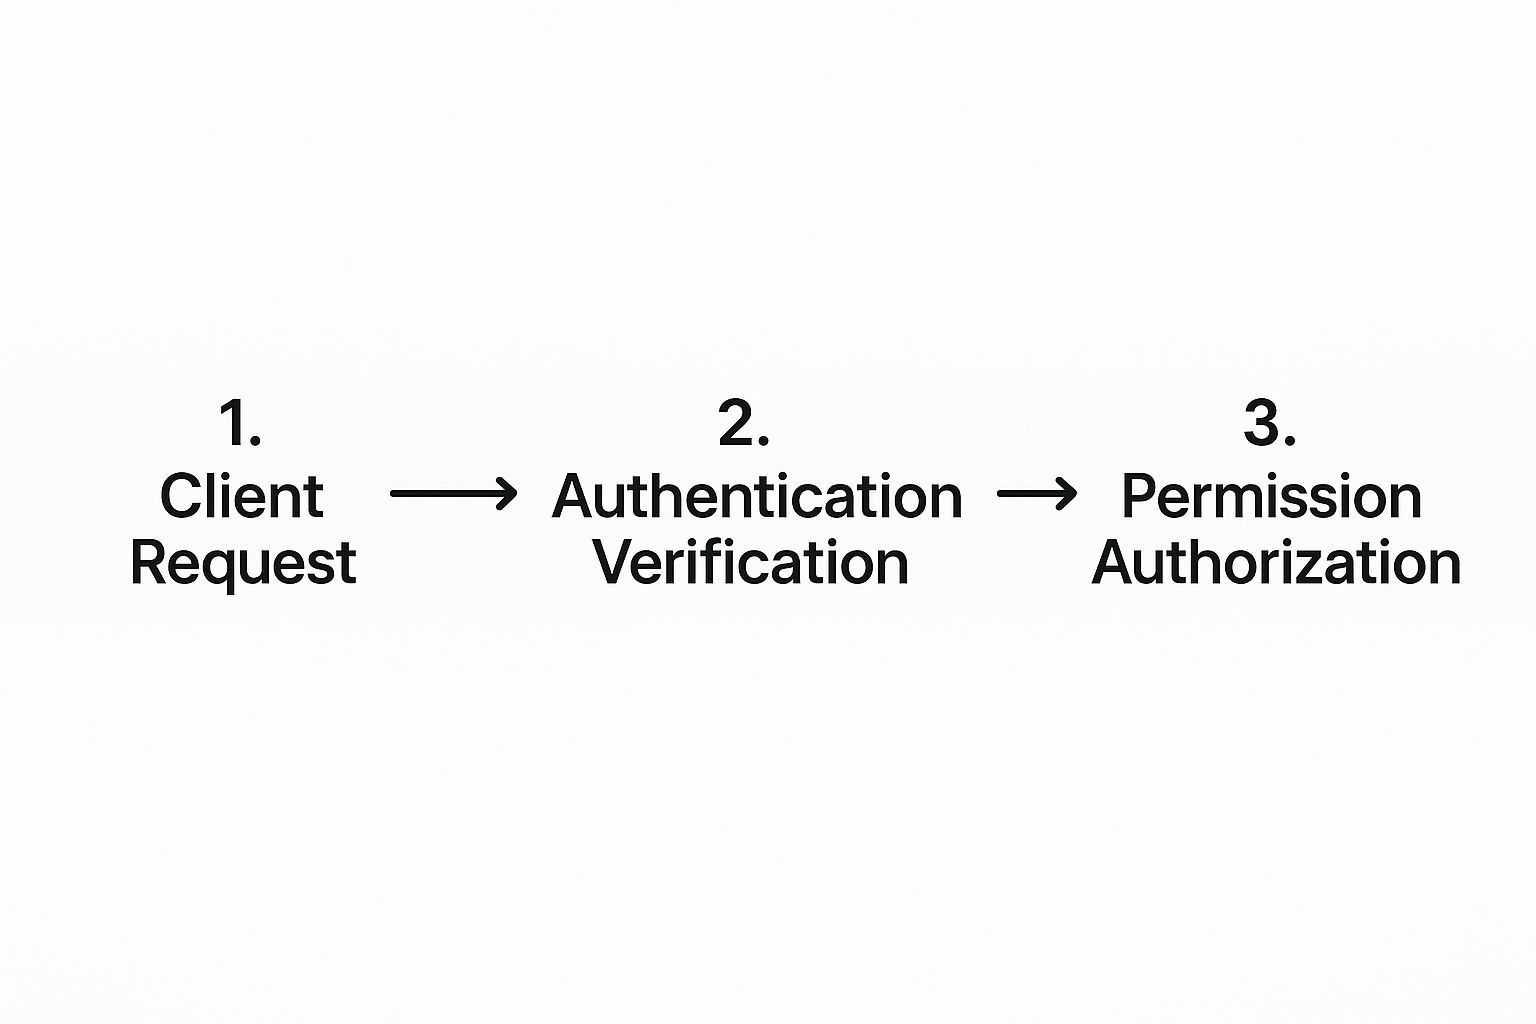
As you can see, every request first has to pass through an authentication check to confirm who the user is. Only after their identity is verified does the system check their permissions to see if they're actually allowed to perform the requested action. This two-step process is crucial for securing your API endpoints.
Securing Your API with Authentication and Permissions
Leaving an API unsecured is like leaving your front door wide open. Once your endpoints are up and running, the next critical step is to lock them down. You need to be sure that only the right people can access and change your data.
This is where building a secure api with django really shines. The Django REST Framework (DRF) comes packed with robust security features right out of the box. We'll focus on two core concepts here: Authentication (who is this user?) and Permissions (what can this user do?). Getting this right is non-negotiable.
Choosing the Right Authentication Method
DRF offers several authentication schemes, each suited for different situations. If you're building a traditional web app where the frontend is also Django, SessionAuthentication works great.
However, for most modern APIs that serve mobile apps or JavaScript frontends, token-based authentication is the industry standard. It’s more flexible and stateless.
Here's how TokenAuthentication works: a user logs in, and the server issues them a unique, secret token. From then on, the client just includes that token in the header of every request to prove who they are.
Let's get this set up.
First, you need to add rest_framework.authtoken to your INSTALLED_APPS list in settings.py. After you save the file, run the migrations.
python manage.py migrate
This little command sets up the database table needed to store all the user tokens. Now, we need to give users a way to trade their username and password for a token. DRF has a built-in view for this, which makes our lives easy.
Just open up api_project/urls.py and add the endpoint:
from rest_framework.authtoken import views as authtoken_views
urlpatterns = [
# ... your existing urls
path('api-token-auth/', authtoken_views.obtain_auth_token)
]
That's it. Now, when a user sends a POST request with their credentials to /api-token-auth/, they'll get their shiny new token back in the response.
Locking Down Endpoints with Permissions
Okay, so now we can identify users. But what can they actually do? By default, anyone can hit our API endpoints, which is a massive security hole. We need to fix that.
Let's start by requiring users to be authenticated to access our Todo endpoints. It just takes one line of code in api/views.py.
from rest_framework.permissions import IsAuthenticated
class TodoViewSet(viewsets.ModelViewSet):
# ... queryset and serializer_class
permission_classes = [IsAuthenticated]
With this simple change, any request made without a valid token will be rejected with a 401 Unauthorized error. Problem solved.
Authentication confirms who you are, but permissions determine what you can do. You need both. A user might be authenticated, but that doesn't mean they should be able to delete someone else's data.
Creating Custom Permissions for Granular Control
The IsAuthenticated permission is a good start, but it has a big flaw in our setup: any logged-in user can view, edit, or delete anybody's todos. That's definitely not what we want. We have to make sure users can only mess with their own stuff.
This is a perfect scenario for a custom permission. Let's create a new file called api/permissions.py:
from rest_framework import permissions
class IsOwner(permissions.BasePermission): """ Custom permission to only allow owners of an object to edit it. """ def has_object_permission(self, request, view, obj): # Read permissions are allowed to any request, # so we'll always allow GET, HEAD or OPTIONS requests. if request.method in permissions.SAFE_METHODS: return True
    # Write permissions are only allowed to the owner of the todo.
    return obj.owner == request.user
Of course, for this to work, our Todo model needs to know who its owner is. You'll need to add an owner field to the Todo model, linking it back to Django's built-in User model with a ForeignKey.
Once you've updated the model and serializer, you can pop this new permission into your viewset in api/views.py:
from .permissions import IsOwner
class TodoViewSet(viewsets.ModelViewSet):
# ...
permission_classes = [IsAuthenticated, IsOwner]
And just like that, our API is properly secured. Users have to be logged in, and they can only edit or delete the Todo items they created themselves. This kind of granular control is absolutely essential for building a trustworthy api with django.
Getting Your API Ready for the Real World
Moving your Django API from your local machine to a live server is a huge step. It’s where your project stops being a prototype and starts becoming a real, professional service that people can depend on. This isn't just about pushing code; it’s about building a system that’s tough, scalable, and won't crash under real-world pressure.
There are a few practices that are absolutely critical at this stage. We need to think about things like API versioning, so future updates don't break existing applications. We also need to handle large amounts of data gracefully with pagination and protect our server from being overwhelmed by implementing throttling.
Must-Have Production Practices
These features are what make an API feel stable and professional. If you skip them, you're likely to end up with frustrated users and a maintenance nightmare down the road.
Here are the non-negotiables for any production API:
- API Versioning: Always include a version number in your URL, like
/api/v1/todos/. This is a lifesaver. It lets you launch av2with breaking changes without affecting anyone still using the originalv1. - Pagination: Imagine an endpoint returning thousands of database records at once. It would be incredibly slow and could crash your server. Pagination breaks down huge results into manageable "pages," and thankfully, Django REST Framework makes this really simple to set up.
- Throttling: You need to set rate limits. Throttling controls how many requests a single user can make over a certain period, which is essential for stopping denial-of-service attacks and ensuring fair use for everyone.
Clear and accessible documentation is one of the most important features of a professional API. If developers can't figure out how to use your endpoints, they won't.
Generating Your API Documentation
Nobody enjoys writing API documentation by hand. It's boring, and it gets outdated the moment you change a line of code. The good news is, we can automate this.
DRF works beautifully with tools like Swagger (OpenAPI) and Redoc to generate interactive API docs straight from your codebase. By installing a package like drf-spectacular, you can automatically create a schema that details all your endpoints, their expected inputs, and their possible responses. This schema powers a user-friendly interface where developers can not only read about your API but also test it right from their browser.
Finally, a solid production environment needs a smart DevOps strategy. If you're looking to build out an efficient deployment pipeline and make sure your infrastructure can scale, it's often worth looking into professional DevOps services to get expert guidance. Taking these final steps ensures your API isn’t just working—it’s reliable, secure, and ready for other developers to build on.
Got Questions About Building Your Django API?
As you dive into building your first API with Django, you’re bound to run into a few common roadblocks. Getting these sorted out early will save you headaches down the line and help you build a more solid foundation for your project.
Let's clear up some of the most frequent questions developers ask.
Django vs. Django REST Framework: What's the Deal?
So, what's the real difference between plain Django and the Django REST Framework (DRF)? I like to think of it like this: Django is the whole car—a powerful web framework that handles your database models, URLs, and all the core application logic.
DRF is like a specialized, high-performance engine you drop into that car. It's a toolkit built specifically for creating APIs. It gives you things like serializers, ready-to-go authentication schemes, and generic views that make building RESTful services incredibly fast. You could do it with Django alone, but DRF handles all the repetitive, tricky parts for you.
Can I Just Build an API With Django and Skip DRF?
You absolutely can. Django has built-in tools like JsonResponse that let you return JSON data right from a view. No extra packages required.
But here’s the catch: you'll be on the hook for a lot of manual work. Think about converting your models to JSON (serialization), validating all the incoming data, and building your own authentication and permission systems from the ground up. It’s definitely possible, but DRF automates all of that, saving you a ton of time while making sure you stick to best practices.
How Do I Fix Those Annoying CORS Errors?
If you've ever built a separate frontend for your API, you've probably seen a Cross-Origin Resource Sharing (CORS) error. It's a security feature built into browsers that stops a website from making requests to a different domain.
The go-to solution in the Django world is a package called django-cors-headers. It's simple to set up:
- Install the package.
- Add it to your
INSTALLED_APPSand middleware. - Specify which domains are allowed to talk to your API.
For instance, in your settings file, you'd add something like CORS_ALLOWED_ORIGINS = ['http://localhost:3000', 'https://your-frontend-app.com']. This tells the browser that requests from your local development server and your production frontend are safe to accept.
At 42 Coffee Cups, we live and breathe this stuff, building high-performance web applications with Python/Django and Next.js. If you need an experienced team to help you launch a rock-solid MVP quickly, see how we can help.